Adding MemTest86 to Grub
Background:
Some of our customers have been asking whether Memtest86 can be used in conjunction with Grub. Grub is a popular boot loader that many popular Linux distributions come pre-packaged with, such as Ubuntu LTS. In our instance, Grub can be used to chainload our popular MemTest86 software, directly from a local boot disk/partition on the system.
The following guide provides users with step-by-step instructions on how to configure and use Memtest86 x64 with Grub v2.04 running under Ubuntu 20.04 LTS 64-bit. Please note that the same steps will likely work with other Linux distributions, however this is the only configuration we’ve tested, and thus cannot guarantee compatibility or provide support for other configurations (e.g. different Linux distros, older Grub versions etc.) The guide assumes that the user is familiar with Linux operating systems and terminal commands.
Note: a UEFI system and the 64-bit version of MemTest86 are required in this guide.
Pre-requisite: enabling Grub menu during boot:
On some Linux distributions such as Ubuntu 20.04 LTS, the Grub boot menu is hidden by default, and ‘skipped’ during the boot process. As such, the first step will likely require forcing Grub to permanently display it’s menu, by performing the following steps:
- Open the file /etc/default/grub with a text editor, you will see the following contents:
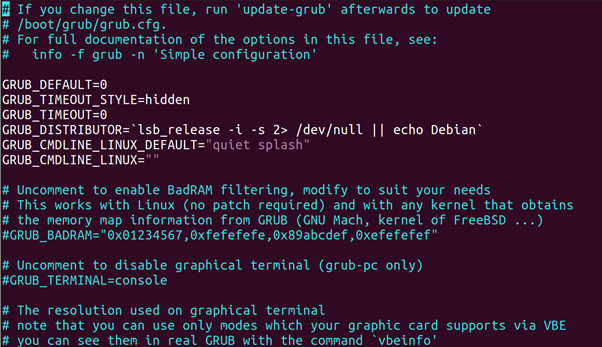
- Change the following two lines and save, close the file:
GRUB_TIMEOUT_STYLE=menu
GRUB_TIMEOUT=10
- Update the grub configuration by running the command below:
sudo update-grub
1. Create a boot image from the MemTest86 zip file:
Download the MemTest86 zip file available from the PassMark website. Unzip it within its current directory, and then use the built-in fdisk utility to analyse its contents and determine the correct mount point:
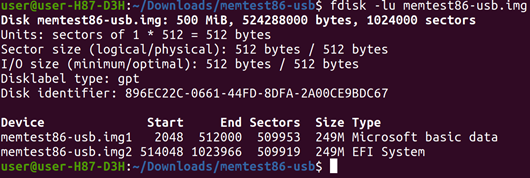
In the screenshot above, the file that needs to be mounted is the ‘memtest86-usb.img2’ file, which contains the EFI boot image. As such, we need extract this file and mount it to a temporary location/folder, using the below series of commands.
Create a temporary directory using the following command:

Next, mount the image file to the temporary directory chosen earlier, by calculating the correct mount offset (obtained by multiplying the start – 514048 by 512, the size of each sector, resulting in 263192576):

2. Copy the boot image from the temporary drive to the system EFI partition:
In order to perform this, you must first locate and confirm the EFI boot drive partition for your local system. This can be performed by running the df command, and observing the output:
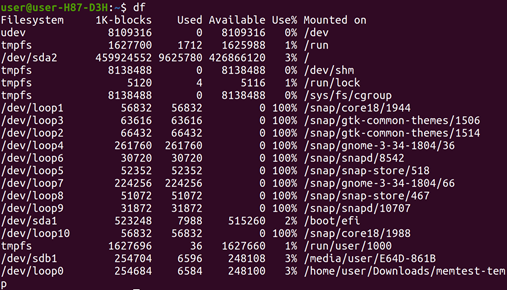
On this particular system, the EFI boot partition (/boot/efi) is stored under /dev/sda1.
Take note of this directory as it directly corresponds to the disk number, and boot partition the EFI file system is on, this information will be needed in subsequent steps. In this particular example:
/dev/sdxy
where x corresponds to the disk number. a = disk 0, b = disk 1, etc.
where y corresponds to the partition number. 1 = partition 1, 2 = partition 2, etc.
Now, copy the locally created /EFI/BOOT directory to your system’s EFI boot directory using the following command:

For NVMe drives:
If your EFI boot partition is on a NVMe drive, the above step will not display the correct partition. Instead you will need follow the below to get the correct disk and partition:
Type "c" on the grub menu to get a command line. Then "ls" to get a list of all the drives. The drive/partitions are all listed as (hd#,gpt#), regardless of what they are physically. Then list the root using "ls (hd#,gpt#)/", for each drive until you find the EFI boot partition.
3. Modify the Grub config to add a MemTest86 boot option:
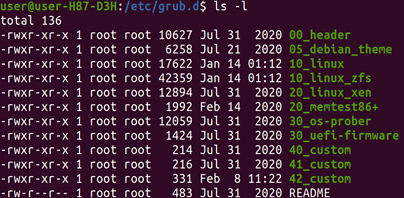
Navigate to the grub config file directory. Below are the contents of the directory on a fresh Ubuntu installation. In our case we will be editing the 40_custom file. This file is a template that you can use to create additional entries to be added to the boot menu.
Open the file in a text editor (with sudo privileges) and add the following text:
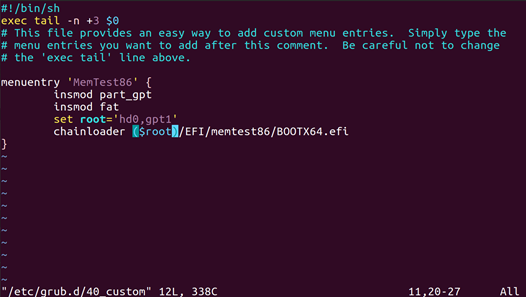
Pay attention to the following line:
set root = ‘hd0,gpt1’
Based on your specific environment, edit this line as follows:
hd(x); where (x) = disk number identified in Step 2.
gpt(x); where (x) = partition number identified in Step 2.
Save and close the file.
Finally run the below command to update your grub config, and then reboot your system.
sudo update-grub
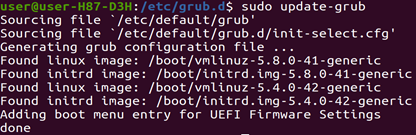
Assuming the above steps were successfully performed, the grub bootloader menu should now appear, and display MemTest86 as an option.


